Monthly Archives: May 2014
How to Negotiate Repairs after Your Home Inspection

1. Ask for a credit for the work to be done
2. Think ‘big picture’
3. Keep your cards close to your chest
Eyes wide open

Three Often Overlooked Spring Home Maintenance Items
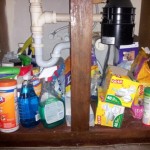
1. Checking under the kitchen sink.
We use our kitchen sink more than any other sink in the house. Even a small drip can cause quite a bit of damage if not caught early. It can cause damage to your cabinets, drywall and to items stored under the sink. It can also lead to mold and mildew growth which can be followed by an unpleasant musty odor. These small leaks are usually easy to fix when found.
Often times we fill the cabinet below our sink with items that block our view of the cabinet base and plumbing. It is a good idea to clean out the cabinet, throw away any unneeded items and place the rest in one or two inexpensive plastic baskets which can easily be taken in and out of the cabinet when needed. These will also serve to help keep liquids upright and avoid spills onto the cabinet.
Once you have cleared the cabinet base, look for signs of leaks such as stains, wet spots, and swollen cabinet base. Then clean the base bottom and dry it thoroughly. Place a few paper towels at the base of the cabinet and turn on the faucet. Run the garbage disposal also and look for leaks. A flashlight will help you see more clearly. If you can run the dishwasher through a cycle before placing items back in the cabinet, do it. Usually if there are any leaks they can be easily fixed by simply tightening a connection or replacing minor components.
While you are checking under the sink, take a look at the electrical wires (usually for dishwasher and garbage disposal). The cords for these appliances should have a fairly tough protective outer layer. Make sure they all look to be in good shape and have not been damaged by any unwanted visitors. Also make sure your under sink outlet has a cover plate on it. You do not want any leaks to fall on exposed or damaged wires or onto open receptacle boxes.

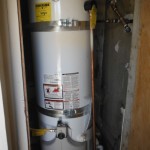
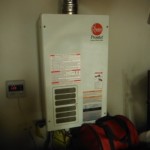
2. Water Heater
Whether you have a tank-less water heater or a water heater with a storage tank, they do need to be regularly maintained. Maintaining these components regularly can extend their lifespan and help you avoid that ice cold shower in the morning when they fail unexpectedly. Both types can suffer from a buildup of scale and mineral deposits and do need to be periodically flushed out. Many tank-less water heater owners think that once these units are installed, they can just forget about it. Not true, these also need regular maintenance.
Flushing out a water heater with a tank is a fairly straight forward procedure. First turn off the power and/or gas to the water heater and turn off the cold water supply to the tank (via a shut off valve above the unit). Second attach a hose to the drain valve near the bottom of the tank, make sure the other end of the hose has somewhere to drain to, and then open the value which should be right by where you attached the hose to. After the tank has finished draining, turn the cold water supply back on for a few minutes to flush out any stubborn sediment remaining in the bottom of the tank. Turn the cold water supply back off and close the drain valve and disconnect the hose. Finally open the cold water supply to fill the water heater back up, flip the power back on or re-light the pilot light if needed. You are ready to go.
While you are doing this, do a quick visual inspection of the tank. Is there any corrosion on the fittings? These can lead to leaks. Is there any water leaking out of the tank? Usually apparent by rust stains or mineral deposits outside the tank. These types of water heaters will usually last about 8 to 12 years, so be prepared and budget for replacement, if it is past its lifespan. They can and usually do last longer than their projected lifespan, but be prepared to replace when necessary.
Tank-less water heaters also need to be flushed but the specific directions does vary for each manufacturer but is the same concept as a water heater with a tank. You might need to purchase specific hosing lines if they were not provided with your heater. You will need to pull out the owner’s manual and follow the directions carefully. You will be able to find directional videos on the internet if needed.
**Make sure no one in your house planning to take a shower while you are doing this! With a regular water heater it will take some time for the water to heat back up.
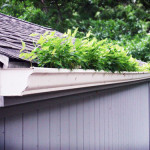
3. Gutters, Gutters, Gutters!
We all know that gutters should be cleaned out periodically, but we never do. I often see plant life and vegetation growing in the gutters during my inspections. Gutters will over time fill up with debris, leaves, dirt and roofing materials (especially if you have a composite roof shingles). Not only does this debris hinder the water from draining out, but the weight of the debris can pull the gutters away from the fascia. Having a gap between the roof line and the gutters will cause the water to run down the side of the house and defeats the purpose of draining the water away from your house with a gutter system.So, cleaning out your gutters once a year is important. While doing this, check to make sure that they are still properly attached to the house. Make sure the downspouts are still firmly attached to the gutters, with mechanical fasteners. Also make sure that the downspouts are draining the water away from your house, not just creating a pool of water at the base of the structure over the foundation. You may need to add downspout extensions to achieve this and to divert the water away from the structure.